How Do You Snip On A Chromebook: A Comprehensive Guide
Snipping or taking screenshots on a Chromebook is an essential skill that every user should master. Whether you're working on a project, sharing content, or documenting an issue, knowing how to capture your screen effectively can save time and enhance productivity. In this article, we'll explore the various methods to snip on a Chromebook, ensuring you have the knowledge to perform this task with ease.
Chromebooks have gained popularity due to their simplicity and efficiency. As more users adopt this platform, understanding its functionalities becomes crucial. One of the most frequently asked questions among Chromebook users is, "How do you snip on a Chromebook?" This guide will address that question comprehensively.
By the end of this article, you'll be equipped with multiple techniques to capture screenshots, edit them, and share them effortlessly. Let's dive in and explore the world of screen snipping on Chromebooks.
Read also:What Is The Meaning Of Consequences In Hindi A Comprehensive Guide
Table of Contents
- Introduction to Snipping on Chromebook
- Methods to Snip on a Chromebook
- Using Keyboard Shortcuts for Snipping
- Chrome OS Built-in Snipping Tools
- Third-Party Apps for Snipping
- Editing Your Screenshots
- Sharing Your Screenshots
- Tips for Effective Snipping
- Troubleshooting Common Issues
- Conclusion and Next Steps
Introduction to Snipping on Chromebook
Why Snipping Matters
Snipping, or taking screenshots, is a fundamental feature that allows you to capture visual information quickly. On a Chromebook, this function is particularly useful for students, professionals, and casual users alike. Whether you're documenting a process, creating tutorials, or simply capturing important information, knowing how to snip on a Chromebook is invaluable.
In today's digital age, the ability to share visual content is essential. Chromebooks, with their streamlined interface, make this process as straightforward as possible. By mastering the art of screen snipping, you can enhance your productivity and communication.
Methods to Snip on a Chromebook
Various Techniques for Capturing Screenshots
There are several methods to snip on a Chromebook, each catering to different user preferences and scenarios. Below, we'll explore the most common techniques, ensuring you have a versatile toolkit for screen capturing.
- Keyboard Shortcuts: The quickest way to take a screenshot.
- Chrome OS Tools: Built-in features designed for seamless snipping.
- Third-Party Apps: For advanced users who need more customization.
Using Keyboard Shortcuts for Snipping
Keyboard shortcuts are the fastest and most efficient way to snip on a Chromebook. By mastering these shortcuts, you can capture your screen in seconds without navigating through menus.
Step-by-Step Guide
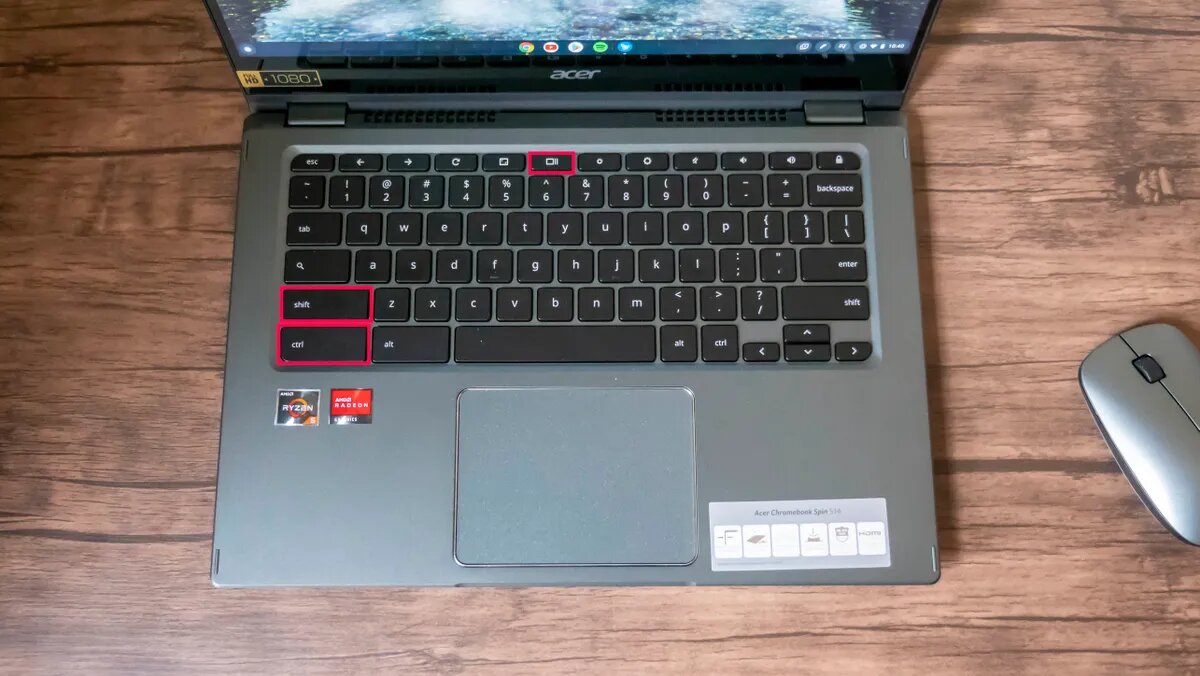
To take a full-screen screenshot, press the Search + Refresh keys simultaneously. For a partial screenshot, use the Shift + Search + Refresh combination. This method allows you to select a specific area of the screen, making it ideal for focused captures.
Once you've taken a screenshot, it will automatically be saved in the "Screenshots" folder on your Chromebook. You can access this folder through the Files app for further editing or sharing.
Read also:Products Offered By Lowes Home Improvement Newport Your Ultimate Guide To Home Solutions
Chrome OS Built-in Snipping Tools
Chrome OS comes equipped with powerful built-in tools for screen snipping. These tools offer a user-friendly interface and a range of features to enhance your screenshot experience.
Snipping Tool Features
- Screen Capture Mode: Choose between full-screen, window, or region capture.
- Delay Timer: Set a timer to capture your screen after a few seconds.
- Annotation Tools: Add notes, highlights, or shapes to your screenshots.
Access the Snipping Tool by pressing Ctrl + Shift + S. This will open a menu where you can select the type of capture you want to perform. The tool is intuitive and designed to cater to both beginners and advanced users.
Third-Party Apps for Snipping
While Chrome OS provides robust built-in tools, some users may prefer third-party apps for enhanced functionality. These apps offer additional features such as advanced editing tools, cloud integration, and customizable shortcuts.
Popular Third-Party Apps
- Snagit: A professional-grade app for capturing and editing screenshots.
- Greenshot: A lightweight app with a variety of editing options.
- LiceCap: Ideal for creating GIFs from your screen captures.
Installing third-party apps is straightforward on Chromebooks. Simply visit the Google Play Store or Chrome Web Store, search for the desired app, and follow the installation instructions.
Editing Your Screenshots
Taking a screenshot is just the beginning. Editing your screenshots can enhance their clarity and convey your message more effectively. Chromebooks provide several options for editing screenshots, both through built-in tools and third-party apps.
Basic Editing with Chrome OS
After taking a screenshot, you can open it in the Photos app for basic editing. This app allows you to crop, rotate, and annotate your images. For more advanced editing, consider using third-party apps like GIMP or Adobe Express.
Sharing Your Screenshots
Once you've captured and edited your screenshot, the next step is sharing it. Chromebooks make this process seamless, offering multiple options for sharing your content.
Sharing Methods
- Email: Attach your screenshot to an email for quick sharing.
- Google Drive: Upload your screenshot to the cloud for easy access and sharing.
- Social Media: Directly share your screenshot on platforms like Twitter or Instagram.
Most sharing methods can be accessed directly from the Files app, making it convenient to distribute your content to others.
Tips for Effective Snipping
To make the most of your screen snipping experience, consider the following tips:
- Organize Your Screenshots: Keep your screenshots organized in folders for easy retrieval.
- Use Annotations Wisely: Highlight important areas without cluttering the image.
- Experiment with Apps: Try different apps to find the one that best suits your needs.
By following these tips, you can ensure that your screenshots are not only functional but also visually appealing.
Troubleshooting Common Issues
Occasionally, users may encounter issues when trying to snip on a Chromebook. Below are some common problems and their solutions:
Solutions to Common Problems
- Screenshot Not Saving: Ensure that your Chromebook has enough storage space.
- Snipping Tool Not Opening: Restart your Chromebook and try again.
- Editing Tools Not Working: Update your apps and Chrome OS to the latest version.
If these solutions don't resolve your issue, consider reaching out to the Chromebook support community for further assistance.
Conclusion and Next Steps
In conclusion, knowing how to snip on a Chromebook is a valuable skill that can enhance your productivity and communication. By utilizing keyboard shortcuts, built-in tools, and third-party apps, you can capture, edit, and share screenshots with ease.
We encourage you to practice the techniques discussed in this article and explore the various tools available. Don't hesitate to leave a comment below if you have any questions or additional tips to share. Additionally, consider exploring other articles on our site to further enhance your Chromebook experience.
Thank you for reading, and happy snipping!


